A solar charge controller that fails to recognize your battery can leave your entire solar power system inoperable. This frustrating issue—where the controller shows no battery voltage, displays error codes, or simply won’t charge—is surprisingly common in both small off-grid setups and large commercial installations. According to industry troubleshooting data, over 60% of solar charge controller failures stem from connection problems, incorrect settings, or battery voltage outside the acceptable range.
As a leading solar charge controller manufacturer, Cosuper helps thousands of customers troubleshoot and resolve battery recognition issues every year. In this comprehensive guide, we'll walk you through the top causes and proven fixes to get your system back online quickly and safely.
Why Solar Charge Controller Isn't Recognizing the Battery
Understanding the root cause is the first step toward a solution. Below are the most common reasons a solar charge controller fails to detect your battery.
1. Loose or Corroded Battery Connections
Loose terminals, corroded cables, or poor contact prevent the controller from detecting battery voltage. Even a small amount of corrosion can increase resistance enough to block the signal.
Fix:
Disconnect all power (battery first, then solar panels)
Clean terminals with a wire brush and baking soda solution
Tighten all connections to the manufacturer's torque specification (typically 5–7 Nm for 12V systems)
Reconnect in the correct order: battery first, then solar panels
2. Battery Voltage Too Low (Below Controller's Operating Threshold)
Most solar charge controllers require a minimum battery voltage to power on—typically 10.5V for 12V systems and 21V for 24V systems. If your battery is deeply discharged, the controller may remain "dead" or show no display.
Fix:
Measure battery voltage with a multimeter
If below threshold, charge the battery using an external AC charger or jump starter
For lithium batteries with BMS protection, use a 12V source to "wake up" the BMS
Once voltage returns to normal, reconnect to the controller
3. Incorrect Battery Type Settings
Many MPPT and PWM controllers allow you to select battery chemistry (Flooded, AGM, Gel, Lithium). If the settings don't match your actual battery, the controller may reject charging or fail to recognize the battery properly.
Fix:
Access the controller's menu (via display or app)
Select the correct battery type per manufacturer specifications
Verify voltage settings (bulk, absorption, float) match your battery's datasheet
4. Blown Fuse or Tripped Breaker
An inline fuse between the battery and controller may blow due to reverse polarity, surge, or short circuit. A blown fuse breaks the circuit, preventing voltage detection.
Fix:
Check all fuses (battery side, solar side, load side)
Replace with the same amperage rating
Install fuses in three locations for future protection:
Between controller and battery
Between controller and solar panels
Between battery and inverter
5. Wrong Wiring Order or Polarity Reversal
Connecting solar panels before the battery, or reversing positive/negative terminals, can damage the controller's internal circuitry or trigger protective shutdown.
Fix:
Always connect battery first, wait 30–60 seconds for display to initialize, then connect solar panels
Double-check polarity before connecting
If polarity was reversed, the controller may need replacement (internal fuse often non-replaceable)
6. Firmware Outdated or Controller Malfunction
Older firmware may have bugs affecting battery detection. In rare cases, the controller itself may be defective.
Fix:
Check for firmware updates via the manufacturer's app or website
Perform a hard reset by removing all power for 5 minutes, then reconnecting
If problem persists, contact the solar charge controller manufacturer for warranty support
Troubleshooting Checklist: Step-by-Step
Step | Action | Expected Result |
1 | Measure battery voltage with multimeter | ≥10.5V (12V system) or ≥21V (24V system) |
2 | Inspect and clean all terminals | No corrosion, tight connections |
3 | Check inline fuses and breakers | All intact, correct amperage |
4 | Verify wiring order (battery → controller → panels) | Display powers on within 60 seconds |
5 | Confirm battery type settings match actual battery | Correct chemistry selected |
6 | Reset controller (remove power 5 minutes) | Controller restarts, detects battery |
7 | Test with known-good battery | If works, original battery is faulty |
When to Buy a New Solar Charge Controller
If you've completed all troubleshooting steps and the controller still won't recognize any battery, the unit may be defective. Consider replacing if:
Display remains blank after proper connection
Internal fuse is blown (non-replaceable in most models)
Controller shows error codes that persist after reset
Cosuper: Your Trusted Solar Charge Controller Manufacturer
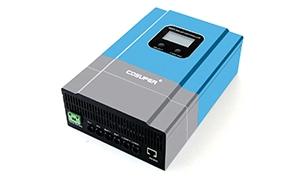
Cosuper is a leading solar charge controller manufacturer serving residential, commercial, and industrial customers worldwide. Our controllers feature:
Smart battery detection with auto-voltage recognition (12V/24V/48V)
Advanced MPPT technology with 97%+ efficiency
Multi-chemistry support (Flooded, AGM, Gel, Lithium)
Over-charge, over-discharge, reverse polarity, and short-circuit protection
Whether you need a single unit or wholesale solar charge controller bulk pricing, Cosuper delivers quality, performance, and competitive rates.
FAQ: Solar Charge Controller Not Recognizing Battery
1. Why does my solar charge controller show 0V battery?
This usually means the battery voltage is below the controller's operating threshold, connections are loose/corroded, or a fuse is blown. Measure battery voltage with a multimeter and check all connections.
2. Can a deeply discharged battery prevent the controller from working?
Yes. Most controllers require at least 10.5V (12V system) to power on. Charge the battery externally first, then reconnect.
3. What's the correct wiring order for a solar charge controller?
Always connect battery first, wait for the display to initialize, then connect solar panels. Reversing this order can prevent detection or damage the controller.
4. How do I reset a solar charge controller?
Remove all power (battery and solar), wait 5 minutes, then reconnect battery first. This performs a hard reset and often resolves detection issues.
5. Will a solar charge controller work with a lithium battery?
Only if it supports lithium chemistry. Select "Lithium" in the settings and ensure voltage parameters match the battery's BMS requirements.
Conclusion
A solar charge controller not recognizing your battery is a common but solvable problem. In most cases, the issue stems from loose connections, low battery voltage, incorrect settings, or blown fuses. By following the troubleshooting steps outlined above—checking voltage, cleaning terminals, verifying settings, and resetting the controller—you can often restore functionality without replacing the unit.
 English